This bulletin has been prepared by Armorpoxy to assist you in making decisions about repairing and prepping your floor. Unfortunately there is not a single ‘magic’ product manufactured that will repair all floors. Depending on your floor type, and repairs needed, you may need to use more than one of the products mentioned below to make proper repairs. Many of the products noted below are available at www.armorpoxy.com. Go to the ‘Online Store’ link, and then select ‘Floor Repair’ to see more information on these items, or to purchase them. Items that we carry are listed in bold type.
- Epoxy floor coatings are measured in ‘mils’ (thousandths of an inch). For reference, standard floor paint dries about 2.5 mils. A medium build epoxy coating system (Armorpoxy II) will cure at 7-15 mils. A high build epoxy coating system will dry at 20-35 mils (ArmorClad and ArmorUltra). For reference, a sheet of standard copy paper is 4.5 mils. If you need to ‘level’ just ¼”, that would be 250 mils, so you can see why using an epoxy to make floor repairs or ‘level’ a floor would be impractical and expensive. Broom finish floors and rough surface floors can have surface variations of up to 1/8” (125 mils) and normally cannot be leveled by epoxy only. The term ‘self leveling’ means that the epoxy will smooth itself out in most cases, at the thickness it is applied at. AS A GENERAL RULE FLOOR REPAIRS NEED TO BE DONE PRIOR TO COATING, AS SURFACE TEXTURE WILL ‘TELEGRAPH’ THROUGH A LIQUID-TYPE FLOOR COATING.
2. LEVELING AND PATCHING HOLES, SPALLS AND CORROSION
-
- These kinds of floors are not easily repaired using an epoxy so use a commercially available cementious type floor resurfacer such as Ardex K-15 or SD-L (www.ardex.com), Quikrete 1249-5 (www.quickrete.com), or CMP Level Finish # 210 or a similar product These products are available nationwide locally at home centers and building material centers and are often referred to as ‘skim coat’ products and come in 50 lb cement type bags. A 50 lb bag will level only 25 square feet (5’ x 5’) at a depth of 1/4:”, so if you need a lot of leveling, you may need quite a few bags of these products to repair your floor. Use these types of products for salt corroded floors and worn floors where the aggregate (rock) is exposed or the floor has ‘acne’ and is pitted. Please allow adequate time according to manufacturer’s recommendations for curing prior to applying the epoxy. These types of products are normally installed with a ‘gauge rake’ and then smoothed over with a floor smoother (Armorpoxy Can supply you with these tools which may not be available locally).
See photo below showing this product being applied to a badly corroded floor.

b. Alternate:Use Armorpoxy Epoxy Mortar Liquid Resin. This product is a 2 part epoxy into which you mix locally-purchased sand (it doesn’t make sense for us to ship sand, the cost would be very high). Use the Epoxy Mortar for filling smaller areas, holes, spalls, etc. Comes in a 1 gal (holds 50 lbs sand) or 3 gal sizes (holds 150 lbs of sand). The Epoxy Mortar Resin (ARMNP1X version) can also be used to make ‘coves’ that are often required by health departments for where walls meet floors in kitchens and baths. We also carry a convenient ‘Cove Tool’ which is a curved trowel that ‘makes’ the cove.
c. Use our Cement Floor Patch. This is a less expensive, and less durable pre-mixed vinyl acetate cement product that you trowel onto the floor. Great for small areas, garages (except where the car will drive on it, we do not recommend this product for driving on). Easy to use, pre-mixed.
d. Use our Crack Repair Epoxy Putty for small areas, cracks, and minor corroded areas (see below).NOTE: ANY REPAIRED FLOOR THAT HAS DIFFERENT PRODUCTS ON IT SUCH AS PATCH, CRACK FILLER, MORTAR, ETC THAT IS DIFFERENT FROM THE ACTUAL FLOOR CONCRETE WILL HAVE DIFFERENT LEVELS OF POROSITY AND ABSORBTION. BECAUSE OF THIS WE STRONGLY SUGGEST THAT ANY FLOOR THAT HAS HAD REPAIRS DONE TO IT SHOULD BE PRIMED WITH THE APPROPRIATE ARMORPOXY MATCHED PRIMER. PRIMING EVENS OUT POROSITY AND HELPS TO PREVENT SHEEN DIFFERENCES FROM THE EPOXY ABSORBING IN AT DIFFERENT RATES, WHICH CAN LEAD TO DIFFERENCES IN SHINE AND APPEARANCE OF THE FINAL RESULT.
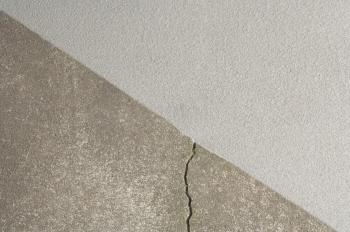
3. CRACK FILLING: Remove any loose or flaking material from cracks. Use angle grinder or other tools if necessary.
-
- Hairline cracks cannot be filled in with epoxy. Repair all cracks and pitted areas prior to etching, except when using the Crack Repair Epoxy Putty or Instant Crack Repair Epoxy Liquid (cures in 15 minutes). Since epoxies are liquid coatings without aggregate, they will ‘fall into’ cracks and the cracks may still appear. To fill hairline cracks use our Crack Repair Epoxy Putty. This product is a 2 part very thick putty-like product that you mix in equal parts on a piece of cardboard or wood, and then use a putty knife to apply to small cracks up to 3/8” wide. It mixes and works similar to auto body-type fillers. This is an excellent product that you can paint right over, and does not require drying or curing time.
See photo below of crack repair done using this product and then coated.
b. To fill larger cracks use our Epoxy Mortar (see above).
c. To fill expansion joints or saw cuts in concrete, fill the joints with sand up to about 3”8” below the surface (this acts as a foundation), and then fill with our Epoxy Mortar (see above). For expansion joints with flexible materials, remove material down to at least ½” below the surface and fill with our Flexible Joint Sealer. This will allow the floor to expand and contract as designed.
d. For filling smaller joints that need to be flexible, use our Fast Setting Epoxy Joint Filler. This is a 2 part epoxy that comes in special dual caulk tubes (you need to obtain or purchase from us the dual caulk gun that mixes the caulk in the tip while applying). This system is like a caulk but much stronger, industrial grade, and faster setting.4. SURFACE PREP
-
- Surface prep is the MOST important step of any coating project. An improperly prepped and prepared floor will result in either a failure, or shortened performance life. Prepping can be done by either using the ‘acid etch’ method, or mechanical method. New concrete MUST be prepped the same as old concrete.
- Acid Etching: Etching is an excellent low cost way to prep. Etching removes any surface lime which all concrete has, and also creates millions of microscopic pores in the surface for adhesion. If you plan on acid etching you can use our ArmorEtch acid (which is a kinder/gentler buffered acid and has less fumes and does not affect the skin like standard acids), or locally-purchase muriatic acid. Normal mix is 4 parts water to 1 part acid, but you can use less water if your floor is sealed or particularly dirty. Always rinse well to neutralize any acid and allow to dry fully before coating with epoxy (normally overnight, can be longer based on conditions. A solution of water and TSP (trisodium phosphate, available at any paint or hardware store can also be used to neutralize acid).
- Sealed floors: Many floors have sealers added to them when poured or applied at a later date. To determine if your floor is sealed, walk around and dribble water droplets on the floor. If it ‘beads up’ like on a hood of a waxed car, then you have a sealer, and sealed floors will resist all coatings. The sealer must be removed by acid etching (normally at higher concentrations, or multiple times), or mechanical means, or by use of our Flash Bond Primer. Repeat prep steps until water does not bead. Sanding a sealed floor prior to using acid etch helps to ‘open up’ the floor to allow the acid to penetrate and etch.
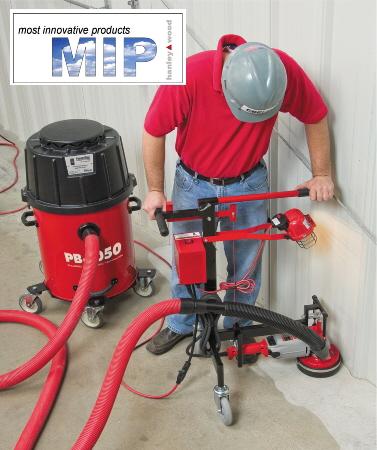
- Mechanical methods: You can use a rotary type sander or diamond grinder (may be available at tool rental stores) or use a shot blasting machine to prepare your floor. These types of tools are available at most tool rental places. Make sure to vacuum well after this step as sanding or grinding creates a lot of dust. Armorpoxy sells an excellent small grinding machine for small/medium sized areas, along with a special vacuum to remove the dust. See photo on next page:
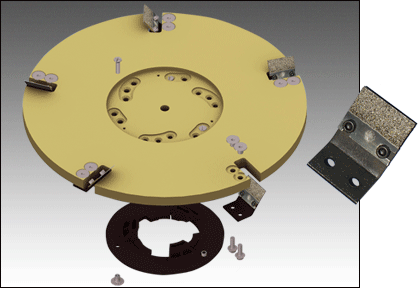
We also carry as a convenience item special Diamond Floor Buffer Pads. These are special plates that affix to standard floor buffers which can be rented inexpensively at any Home Cente. These plates have diamond floating pads on them and do a superb job of prepping concrete, painted surfaces, and removing old glue and adhesives. They are available in different versions for glue (mastic) removal, preparation of previously coated surfaces, and a heavy-duty coating removal tool. They are also available in diamaters of 15”-20” to fit virtually any floor buffer.


See photos below of a diamond floor grinder and shot blasting machine being used. Grinders work well on more even surfaces and helps to smooth out uneven floors, shot blasting works better on rough, uneven and corroded/disintegrating concrete that needs repair. Shot blasting is normally sub-contracted out to companies that have the equipment. Armorpoxy has lists of regional shot blasting companies we can refer you to.


For floors that are not candidates for mechanical or acid etching due to installed equipment, inability to tolerate dust, etc. we offer a special primer called Flash Bond that allows our epoxy to stick to virtually any surface, including non porous and sealed surfaces. This is a 1-part product that rolls on fast and easy. Often the cost of this special primer is equal to using mechanical means to prep.
e. Oily/greasy floors: No standard coating can stick to an oily floor. Oil soaks into concrete, and is impossible to remove completely without concrete replacement. We carry an excellent Oil/Grease Emulsifier which converts oil and petroleum products into a soapy solution which gets rinsed away. If your floor is oil soaked and/or stained, after prepping, check with the water drop test to see if still beading. If so, then you need to use our Oil Stop Primer which is a special primer designed to stick to oily floors. This is an excellent product that is patent-pending.